There’s a wonderful aroma of spring in the air, daffodils are popping up everywhere and the sun actually feels warm enough to take your winter coat off! All over the country people are coming out of winter hibernation and thinking about getting back on their bikes for family bike rides or cycling to school.
Are your bikes still fit to ride?
Before you start cycling or send your kids off on their bikes we recommend taking 10 minutes to carry out some simple bike maintenance. Bikes that have been wintering in a shed may need a little TLC to get them back into condition, ensuring they are also safe for you and your kids to ride.
Don’t Panic! You don’t need to be a mechanic – these simple checks can be carried out by anyone, we recommend letting your kids help so they begin to learn how to take care of their own bikes.
The M Check for Bikes!
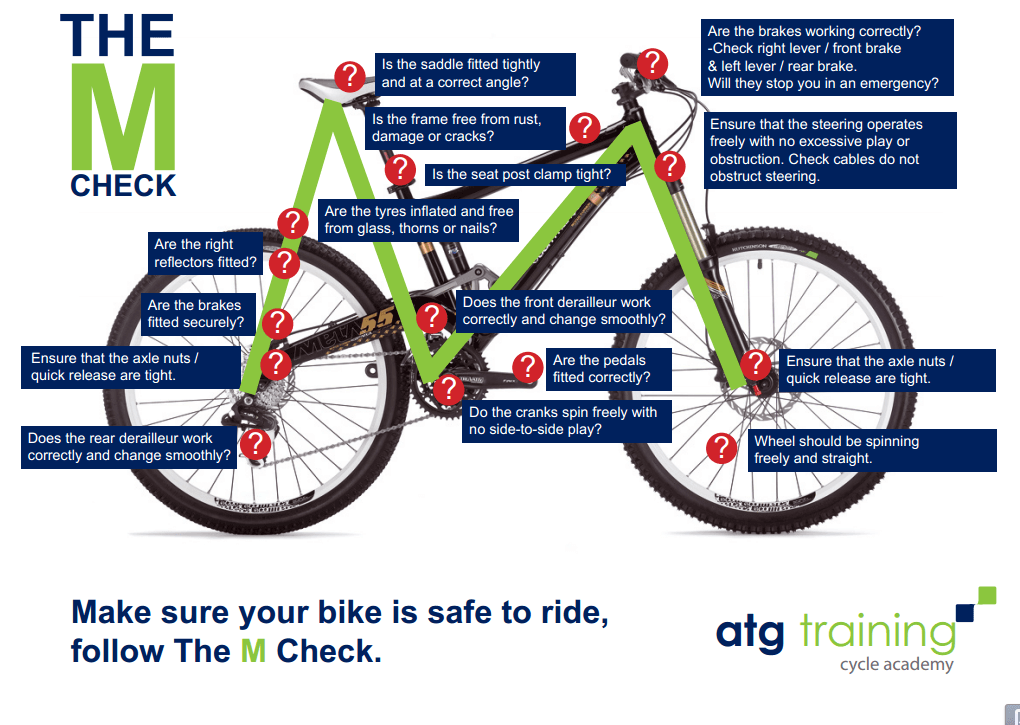
Check your bike using the M Check – an easy way to remember how to check all the vital areas of your bike step by step.
The basic M shape consists of the front wheel; handlebars; pedals; seat and rear wheel. Each area has important components to check. This video will help you!
Front Wheel
Ensure the axle (at the centre of the wheel) does not wobble from side to side at all and that the wheel turns smoothly. Make sure the quick release skewer or axle nuts are fully closed or tight.
Check that the tyre is in good condition and is not excessively worn or cracked. Make sure the tyre is inflated to the recommended tyre pressure (printed on the tyre sidewall)
Ensure none of the spokes are loose and there are no obvious crack or defects in the wheel rim. Spin the wheel to identify any signs or buckling.
Check the brake blocks or pads work effectively when you apply the brake lever. Make sure the brake blocks are correctly aligned over the rim.
Examine the brake cable for wear or fraying.
Handlebars and Headset
Check for any damage to the forks.
Apply the front brake and turn the handlebars under some pressure to check the stem is properly clamped to the handlebars and steerer tube. The front wheel should turn smoothly with the turn of the handlebars.
With the front brake still applied, rock the bike backwards and forwards. If there is some play, it could be a loose headset (don’t confuse this with the action of any suspension forks, if fitted).
Pedals, Cranks and Bottom Bracket
Check the pedals are properly installed onto the crank arms and are not stiff at all
Lift the back of the bike and turn the pedals forwards to see if they turn smootly and easily. Then, with the bike back on the ground, grasp both cranks firmly and try to move them side to side. If there is some play, it is likely to be a loose bottom bracket (the housing for the pedal axles)
If the bike has front gears, check the front gears change smootlhy and the gear cable is not frayed. Also check the front chainrings for any signs of damage or buckling.
Ensure the chain runs smoothly when you turn the pedals and is not too slack. Make sure the chain is properly lubricated and not thick with grease
Seat and Seat Post
Make sure the saddle is firmly attached to the seat post.
Check the seat post is firmly attached in the seat tube of the frame.
Ensure the seat is in a comfortable riding position.
Do not raise the seat post above the maximum safety mark which is clearly visible on the seat post
Rear Wheel
Repeat all the checks for the front wheel for the rear wheel.
If the bike has gears, check the rear gears shift smoothly and do not make any excessive rattling noise. Again examine the gear cable for fraying and the sprockets for any sign of damage.
